While fresh-cut conifers can be unwieldy – precariously trussed to the roof of your car, set to plummet to the street with each sudden stop – the wreath is all class: portable, pretty and a cinch to hang. It’s no wonder people are loopy for them.
“The wreath is a symbol of life, eternity, welcome and comfort,” gushes Natalie Bernhisel– Robinson in her book Living Wreaths. In her comprehensive how-to book, the author, a florist, who runs the shop La Fleur Design in Salt Lake City, Utah, chronicles her affair with the holiday staple.
For Bernhisel-Robinson, and for many of us, a wreath is not solely a snazzy sign of the season, but a means of rekindling holiday memories through scent. It’s “the deeply intense fragrance of bay leaf, eucalyptus and evergreens” that does it for Bernhisel-Robinson. When she plunges her nose into the greenery, she’s instantly transported to holiday mode.
But the wreath – a word derived from the old English “writhen” meaning to “twist” or “writhe” – didn’t start out as Yule-time embellishment. Ancient Europeans decorated their doors with grain-based versions, like straw, to secure good luck for the harvest. Greeks crowned winning athletes with laurel. These were made of interlocked leaves of bay that didn’t quite form a circle. The Renaissance painter Sandro Botticelli depicted the ancient poet Dante donning a laurel circlet to denote his lofty status. Napoleon showboated around in a gilt version at his 1804 coronation.
The wreath is also symbolic of Christian immortality, which is why it often appeared in the glitzy fetes of 19th-century Germany – where Christmas as we know it today got its start. Early Europeans adored their wreaths so much that they were often stand-ins for address numbers on a house. Just imagine: “Postman Bill, deliver the package to the abode with the disk of delphinium on the door!”
Today, anything goes, especially if the wreath is artificial. Maija Reisenauer, who runs Hello Midge Floral Studio in Toronto, is currently advocating for an ombré scheme. Wrap a ring with colourful variants of yarn, felt, pom-poms or sprayed straw.
“Each wreath is a bespoke creation,” adds Johanna Siu, the owner of Vancouver-based Celsia Florist. She has recently observed “a trend towards asymmetrical shapes.” Siu’s favourite wreaths mix natural textures like blue cypress and holly bush while retaining a simple, sculptural design.
Wild wreaths are the antithesis of the voluptuous versions that burst with sprays of evergreen, ivy and crimson berries. Reisenauer has also noticed a trend where people add a border to their wreaths, giving them the gravitas of a painting. To achieve a similar look, pin a ribbon to a chunky, empty frame et voilà.
And natural wreaths that feel like they are assembled with branches foraged on a sylvan stroll are ideal in pared-down Scandinavian spaces and can easily be made at home.
Whether you’re trying your hand at making a wreath or you’ve purchased one, keep it hydrated to maintain freshness. “Thoroughly spray the wreath with water every three to four days,” says Reisenauer. “Or, if possible, soak the underside, where all the stem ends are overnight.”
And if you do, indeed, want to put a wreath on it, the following three options from florists across the country come with supply lists and DIY instructions. The only other thing you’ll need to remember before decorating your front door is to heat some mulled wine for toasting once the job is done.
Curly willow wreath by Maija Reisenauer, Hello Midge Flower Studio, Toronto

Curly willow is the structure for this simple stunner. Adorned with antlers for whimsy and texture, the naturalistic half-moon is covered in moss, chosen for its lime green hue.
Shopping list
Foam circle or twig wreath
Reindeer moss
Sharp scissors
Floral clippers
Wired string or wire
Hot glue gun
Seeded eucalyptus
Cedar greens
Dusty miller or kochla greenery
Wooden antlers (or other ornaments such as pine cones)
Wired ribbon and crochet ribbon Gardener gloves (for applying moss and cutting winter greens)
How to
1.Wearing gardening gloves, apply reindeer moss by hot-gluing it to the wreath frame. Remember you will only be viewing it from the front. so don’t worry about how the back looks. Cut off excess moss and loose strands with scissors.
2. Cut cedar greenery with floral clippers and bundle in the centre. Wire tightly together so that the sprays are going in different directions like a bow tie. Wire the cedar to the bottom of the wreath only.
3. Repeat step 2 with dusty miller or kochla greenery.
4. Attach the decorative element – in this case, antlers – by hot-gluing it to the bottom of the wreath. Wrap with wire for added support, if desired.
5. Cover visible wire with small stems of cedar and seeded eucalyptus.
6. Create a bow by making a loop with the wired ribbon. Pinch centre and repeat based on how many loops you like in the bow. Wrap tightly with wire and wrap ribbon around the centre leaving the ends long.
7. Attach wide crochet ribbon at the top of the wreath and hang.
Woodland winterland wreath by Kelly Bourdon, Blooms & Butterflies, Calgary

In this festive ring, a traditional woodland winterland comes to life with pine and fir boughs that are bound with wire and decorated with cones, ribbon and balls. There’s also the option to add nesting birds cradled in cedar.
Shopping list
Clippers
Hot glue gun
Strong wire or wire wreath form
1 bundle cedar
1 bundle pine
1 bundle fir
4 bows (3 with short tails, 1 with long)
4 pine cones
Branches or twigs (such as Alpine Huck)
Assorted decoration such as small berries, beads or balls
For bird’s nest (optional): 3 bird figures (1 large, 2 small)
Raffia binding wire on a spool
How to
1. Start with a strong wire bent in a circle or a wire-wreath form from the craft store.
2. Take clippings of cedar, pine and fir and make bunches. Tie end of binding wire to wreath form.
3. Lay bunches of fresh greens on form and secure with binding wire. Lay bunches over each other securing with the binding wire as you add more until completed. Keep bunches going in the same direction, then tie off binding wire to frame.
4. Add additional greens to wreath to help tighten binding wire and fill out any holes.
5. Attach four bows at points north, east, south and west. The south bow will have long tails, the other three will have short tails.
6. Wire in four pine cones. Add small branches by forcing them into the binding wire. If adding the bird’s nest, take a few of the larger pieces of huck branches and force them into the design to create a spot to anchor the nest. Make the nest by twisting and glueing raffia in a circle.
7. Wire and glue nest into the bottom of the wreath between the larger branches. Fill nest with small pieces of branches or dried faded flowers. Perch birds as desired in nest.
8. Cut up beaded berry sprays and wire into wreath along with a few small berry pieces and more birds, if desired.
Wild wreath by Johanna Siu, Celsia Florist, Vancouver
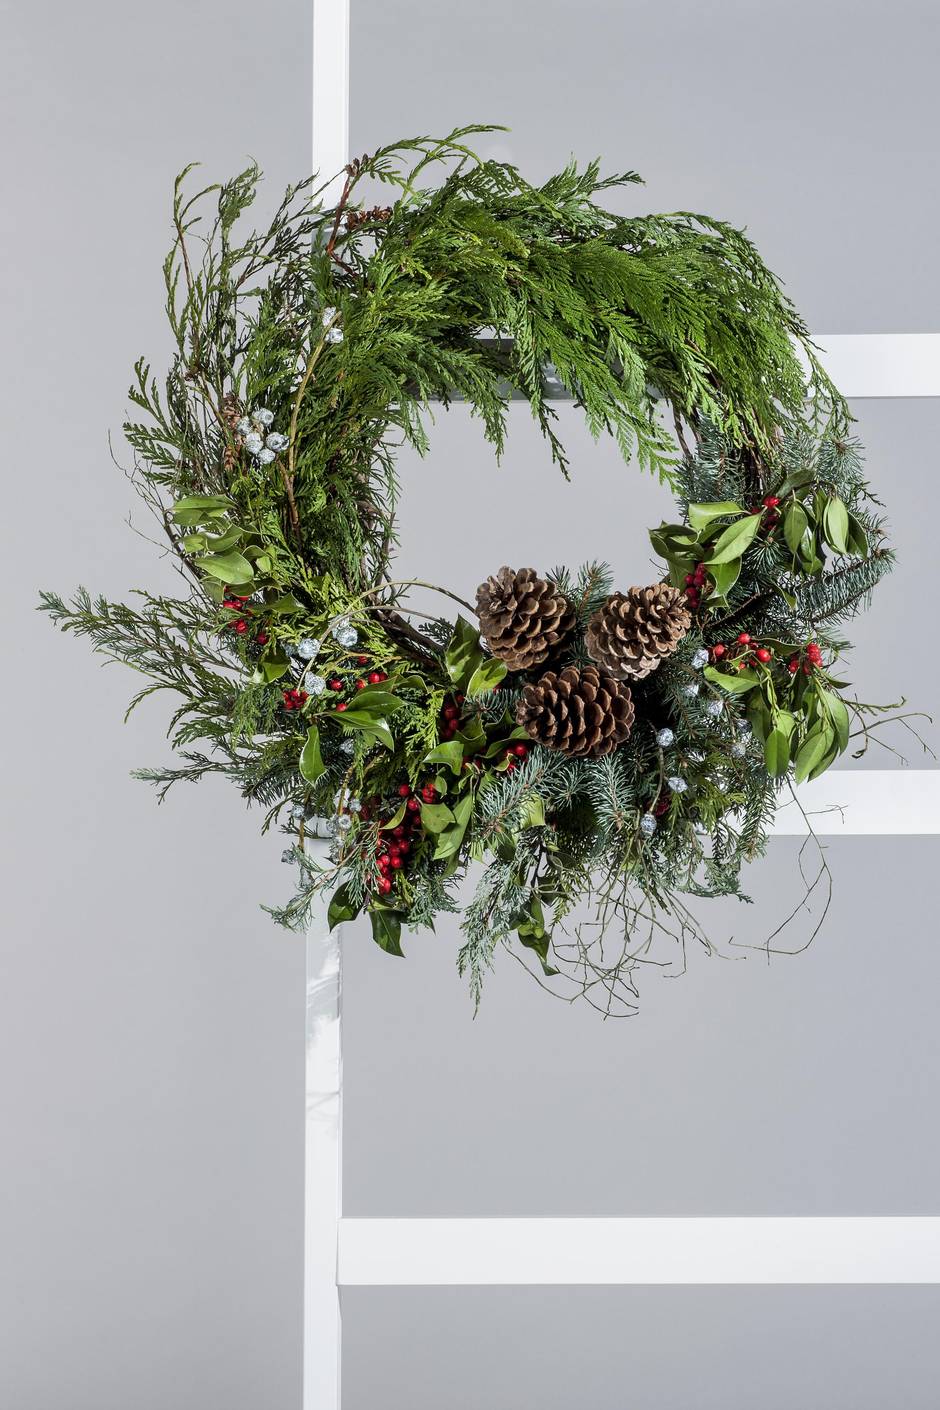
Drawing from nature and what is available locally in the Pacific Northwest, this wild wreath is a medley of foraged holly bush, evergreen foliage, boxwood and mossy and coned branches.
Shopping list
6 stems of cedar
3 stems of lighter evergreen foliage such as Fir, Hemlock or Blue Cypress
3 stems of eucalyptus pods 5 stems of long holly 3 pine cones (on a branch if possible)
Grapevine wreath base, loosely woven 24-gauge paddle wire or thin twine
How to
1. Make a base of evergreen almost all the way around wreath base, starting at the bottom right of your wreath, by tucking in stems of cedar and changing directions half way through. Leave about 1/4 of the wreath base showing and one side of the greens to cascade longer. Secure stems with wire.
2. Tuck in stems of fir close to the halfway mark to highlight and create dimension. Secure with wire.
3. Tuck in eucalyptus pod stems along the inner circle of the wreath base in the same direction as the greens, radiating from the halfway point. Secure with wire.
4. Tuck in holly stems in a similar fashion as the eucalyptus pods, radiating from the halfway point but cascading down in a dramatic way to create motion. Secure with wire.
5. Wire into place pine cone stems at the halfway mark to create a focal point.
Photo shoot credits: Willa white wood dining chair, $199, Sawyer white leaning bookcase, $249, at Crate & Barrel (www.crateandbarrel.com).