Sunday morning is all the occasion you need to serve someone breakfast in bed. (Or take your own coffee and toast to bed and enjoy under the duvet.) A simple tray can be constructed from a variety of materials, but I’m fond of repurposing so I opted to convert a picture frame into something super-functional that I’ll enjoy for many lazy weekends to come.

(Photos by Barry Fraser for The Globe and Mail)
You’ll need
2 12-by-12-inch sheets of black-and-white polka dot paper
double-sided tape
pencil
scissors
small ruler
1 small yellow paper doily
1 large blue paper doily
sticker letters
tweezers
glue stick
tape
5 small felt pads
measuring tape
1 11-by-14-inch image-size picture frame (with a flat frame that’s at least 1.5 inches wide)
1 piece of hardboard (cut at the hardware store to slightly smaller than the back of the picture frame)
8 6-by-1/2-inch pan head screws
drill with bits to fit the screws
screwdriver
2 silver drawer pulls with hardware

Step 1. Place the two sheets of paper side by side, overlapping them slightly and lining up the pattern. Secure with double-sided tape.
Remove the glass from the picture frame and centre it on the paper with the seam in the middle. Trace around the glass and cut along the lines.
Using tweezers, carefully apply the sticker letters to the small doily to spell out “rise and dine.” Apply the glue stick to the back of the small doily and press into place in the centre of the larger doily. Glue the large doily in the centre of the polka dot paper. Put the glass and paper in the frame and attach the backing.

Step 2. Stick five evenly spaced felt pads onto the back of the frame. They’ll fill the gap between the frame insert and backing board you’ll screw on next. This will give the glass extra support when you load up the tray.

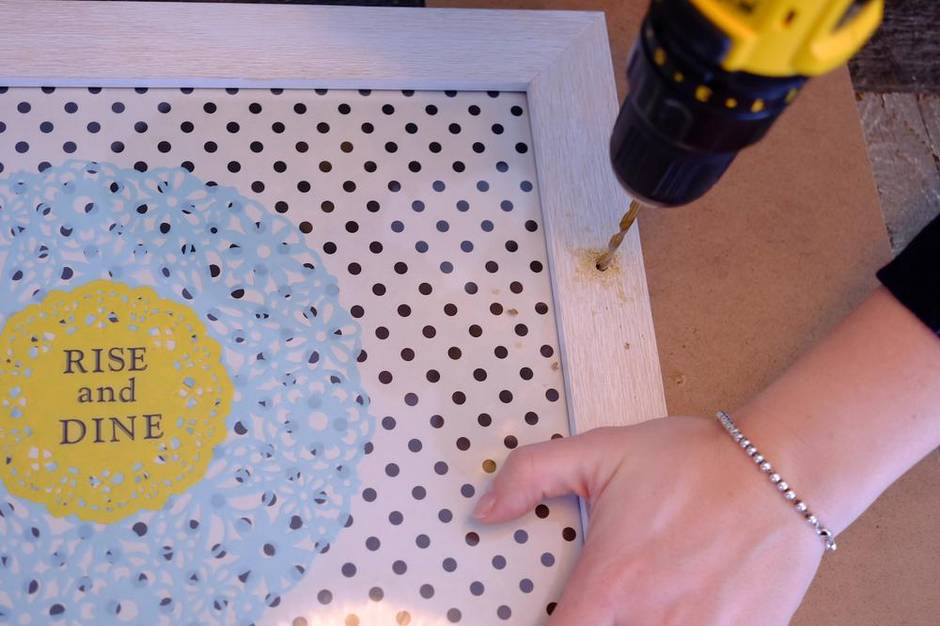
Step 3. Centre the pre-cut hardboard onto the back of the frame. Start in the top right corner and measure 3 inches down the short edge and 4 inches across the long edge, marking with a pencil. Repeat with the other three corners.
Wrap a small piece of tape around the drill bit 1/2-inch from the tip to use as a guide so you don’t drill too deep. Carefully drill the first hole in the top right corner and insert the screw using the screwdriver. Repeat with the bottom left corner.
Once these first two screws are in place you can easily finish the remaining holes without the hardboard shifting. (Tip: If you’re crafting in your kitchen this winter, like I am, keep the vacuum handy to clean up the dusty mess as you go.)
Step 4. Next, attach the handles. Turn the frame over to the front and measure the length and width of the right side of the frame to find the middle point; mark lightly with a pencil. Centre a handle over top and mark where the screws will go on each end. Repeat on the left side of the frame. Place a scrap of hardboard under the frame to protect your work surface. Drill the four holes, going all the way through the frame. Screw on the handles with a screwdriver.
Step 5. All that’s left to do is whip up a delicious brunch. In between breakfast-in-bed mornings the tray can double as a lap desk: Pile it with newspapers and magazines or cookbooks and shopping lists and put it to good use while sitting on the couch or in a favourite chair.