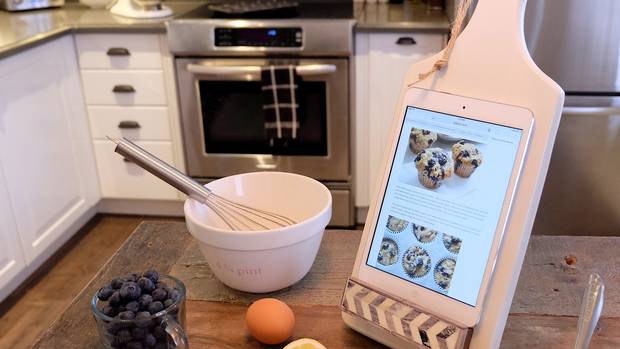
I've been searching for months for a tablet stand to use in my kitchen. Having a spot to prop up my iPad, so it's out of the mess and easy to read while I cook, feels necessary these days, since it's all I've been using for recipes. My old cookbooks don't have a clue about toddler-friendly sugar-free mini muffins and I'm addicted to the On Hand feature in the Whole Foods Market Recipes app. You just input what's in your fridge and it spits out a bunch of recipes to choose from. Genius.
Since the tablet stands at my go-to kitchen store were too modern for my taste and the olive wood ones on Etsy were too pricey for my budget, I decided to make my own. As the motto goes in our house, if you can't buy exactly what you want, you might as well make it. I put this stylish stand together for just $37.
WHAT YOU'LL NEED
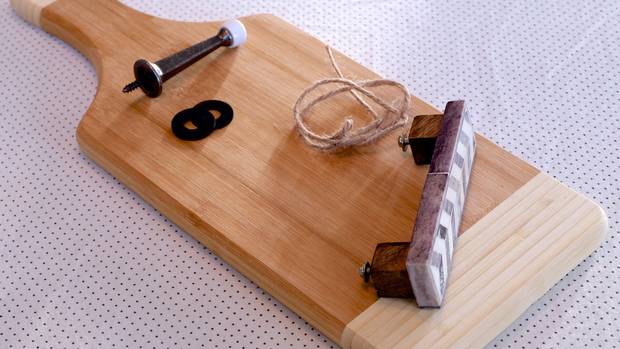
Wooden cutting board (in a size that's slightly larger than your tablet)
Spray paint
Drawer handle
Screws
Doorstop
Washers
Twine
Drill
5/32-inch and 1/8-inch drill bits
Ruler
Pencil
Adjustable wrench
Screwdriver
Scrap piece of wood
Begin by picking up an inexpensive cutting board that's slightly larger than your tablet, to create the back of your stand. (A 17-by-6.5-inch bamboo board was the perfect size for my iPad mini). Next you'll need a straight drawer handle with a bit of a lip (to keep the tablet from sliding off). I splurged on a handmade wood and horn tile handle ($18 at West Elm).
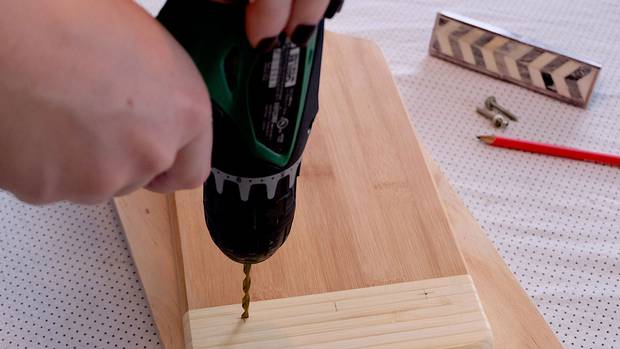
Mark where the handle will go by putting your tablet down on the board and placing the handle underneath to get the right positioning. Use your ruler and pencil to lightly draw a straight line across the board directly under the handle. Measure the width of the board, divide by two and mark the centre point on that line. Next flip the handle over and measure the distance from the middle of one bolt hole to the other. Divide that number in half. On the cutting board, measure along your line from the centre point out in both directions and mark where your holes will be. As my husband says, measure twice and cut once, so double check your measurements before you start drilling. These marks should exactly match the distance between the bolt holes on the handle. Place a scrap of wood under your board to protect the worktable, and using a 5/32-inch bit slowly drill straight through the board.
Flip the board over and using your measurements from before, make a mark in the centre of the board, about 1.5-inches from the bottom. Switch to the 1/8-inch drill bit to make the pilot hole for the doorstop. Measure the thickness of your cutting board and drill no deeper than three quarters of the way in. If the screw on the doorstop is longer than this measurement add a few washers to reduce the length going into the board. Before you start drilling, attach a depth stop (or wrap a piece of masking tape around the bit at the distance you want to drill). This will keep you from going in too far and breaking through the other side.
Once you've made the holes, give the board three coats of paint, allowing them to dry well in between and then set for 24-hours before attaching the hardware. Use the wrench to screw in the doorstop until it's snug. Fasten the hardware that came with the handle using an appropriate screwdriver.
Add a piece of twine to the handle to create a hook, so you can stow your stand away when you need to. I think mine, however, will be occupying a permanent spot on my counter top for the foreseeable future.
Karen Robock lives, writes and crafts in Toronto.